DIY - A quilling snowdrop
- Orsucci Marion
- Feb 25
- 2 min read

The snow will soon melt, giving way to sweet and warmer temperatures and the first snowdrops.
This delicate flower, with petals as white as snow, is the perfect symbol of the transition from winter to spring.
For children who love winter and aren't quite ready to see the snow disappear, this craft project allows them to extend the magic of the season while gently welcoming spring.

Today, I suggest you make a snowdrop using quilling (rolled paper), a creative activity that is gentle, soothing, and accessible to children over 6 years old, either independently or with the help of an adult.
This activity is perfect for:
a spring-themed craft project
a nature-themed craft project with children
developing fine motor skills
practising patience and precision
creating a sweet seasonal decoration
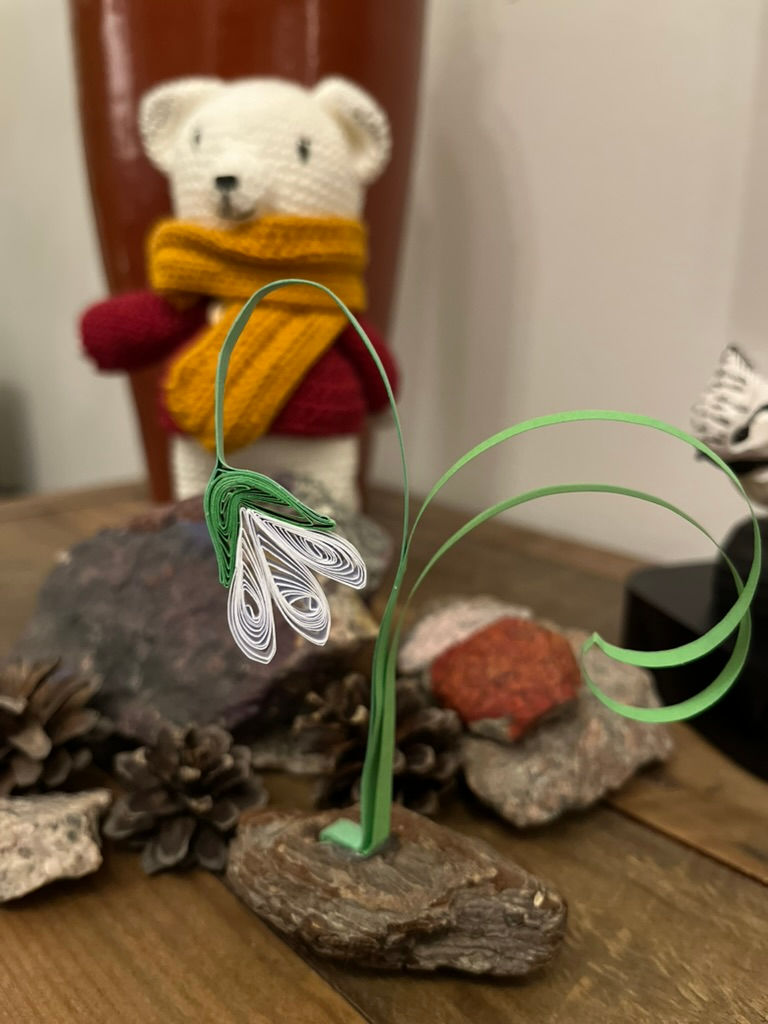
For a natural look, the snowdrop is attached to a piece of pine bark.
Materials to realise one snowdrop:
3 strips of white paper (5 mm x 300 mm)
3 strips of green paper (5 mm x 300 mm)
White vinyl glue
A quilling pen (otherwise, you can use a toothpick or a needle)
A craft knife (to be used by or with an adult only)
A piece of pine bark or a small piece of natural wood
Tips: cutting the paper strips with a paper cutter or box cutter makes it easier to get even strips.
Step-by-step:
Make the white petals


Wrap a white strip around the quilling pen.
Then, holding the paper between your fingers, let it expand slightly to form a flexible spiral.
Squeeze one end to create a drop shape.
Finally, place a dot of glue on the outer end to hold the shape in place.
Repeat the process three times to obtain three petals.
Make the green sepals


Roll up a green strip in the same way.
Then, holding the paper between your fingers, let it expand slightly to form a flexible spiral.
Squeeze the two ends together to create an elongated shape representing the sepals of the flower.
Finally, place a dot of glue to secure the shape.
Flower assembly


Glue the three white petals together, joining the narrowest parts of the drop shapes.
Glue the green sepal shape on top of the petals.
Make the stem


Glue a green strip by the center of the sepals.
Fold the strip over itself to form a stronger stem (double layer of paper), then glue.
Make a leaf


Fold the last green strip in half.
Roll it up slightly at the fold to create movement.
Glue the open ends together for about 5 to 7 cm.
Glue the leaf to the bottom of the stem.
Attach the flower to its natural base


Using a craft knife (this step should be carried out by or with an adult), make a small notch in the piece of pine bark.
Add a dot of glue to the notch, then insert the base of the stem.
Hold it in place for a few seconds to allow the glue to set.
Children can discover the seasons, nature and spring through crafts with this creative activity focused on snowdrops.
Bonus tips: If you don't have natural material to fix the flower, you can glue your creation onto cardstock to make a pretty card.


Comments