DIY – Snowdrop made with Iron Beads
- Orsucci Marion
- Mar 17
- 2 min read

An easy creative activity to welcome spring
Snowdrops are among the first flowers to bloom when winter gives way to spring.
To celebrate this change of seasons, I invite you to make some pretty snowdrop flowers using Iron Beads.

This creative activity is easy for children to do and allows you to make a small spring decoration to put in a pot.
Materials
White and green iron-on beads
Iron-on bead plates (one round, one square)
Baking paper
Iron
Wire (for the stem)
Floral tape
Hot glue gun
Green pipe cleaner
Patterns
Download the snowdrop patterns and replicate them on your bead plates:
Version 1 – Simple Snowdrop flower
Make the flower using iron-on beads on a square plate, following the pattern. Place a baking paper over it and fix the beads with an iron. Let it cool slightly.
Wrap wire with floral tape to create the stem. Form a small loop on one side.
Glue the stem to the back of the flower using hot glue.


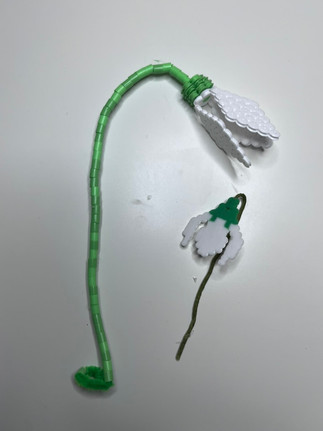
Version 2 – Snowdrop with Curved Petals
Make the flower using iron-on beads on a round plate, following the pattern. Place a baking paper over it and fix the beads with an iron. While the flower is still warm (be careful not to burn your fingers), gently fold the petals downward to create the characteristic shape of a snowdrop.
Let it cool completely.
Use the hot glue gun to attach the three small green circles to the top of the flower.
Glue a green pipe cleaner in the space at the center of the circles to form the stem.
Add a few green beads along the stem for decoration.


These little flowers can be used to decorate a flowerpot, make a spring bouquet or simply for a nature activity with children.


Comments